27.1. API 的基础知识
Web 上的大量数据是:文本、JSON 文件、HTML 文件、CSS 文件、JavaScript 代码等。JavaScript 通过其内置字符串很好地处理这些数据。
但是,在 2011 年之前,它没有很好地处理二进制数据。 2011 年 2 月 8 日推出了 Typed Array Specification 1.0 ,并提供了处理二进制数据的工具。使用 ECMAScript 6,将类型数组添加到核心语言中,并获得以前仅适用于普通数组(.map(),.filter()等)的方法。
27.1.1. Typed Arrays 的用例
Typed Arrays 的主要用例是:
- 处理二进制数据:处理 HTML Canvas 元素中的图像数据,解析二进制文件,处理二进制网络协议等。
- 与本机 API 交互:本机 API 通常以二进制格式接收和返回数据,您无法在 ES6 之前的 JavaScript 中存储或操作。这意味着,无论何时与这种 API 进行通信,每次调用时都必须将数据从 JavaScript 转换为二进制并返回。 Typed Arrays 消除了这个瓶颈。与本机 API 通信的一个示例是 WebGL,最初为其创建了 Typed Arrays。文章“类型数组:浏览器中的二进制数据”(由 Ilmari Heikkinen 为 HTML5 Rocks 提供)“类型数组的历史”部分提供了更多信息。
27.1.2。 支持 Typed Arrays 的浏览器 API
以下浏览器 API 支持 Typed Arrays:
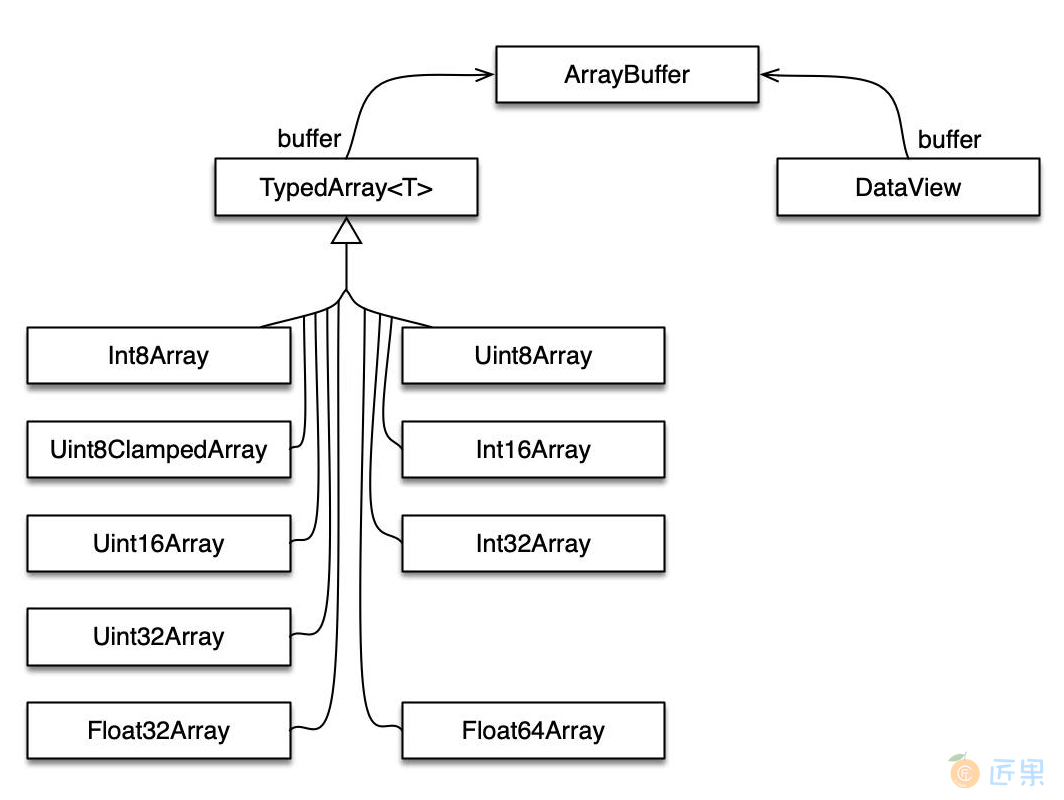
27.1.3. 核心类:ArrayBuffer,类型数组,DataView
Typed Array API 将二进制数据存储在ArrayBuffer的实例中:
const buf = new ArrayBuffer(4); // length in bytes
  // buf is initialized with zeros
ArrayBuffer 本身是不透明的。如果要访问其数据,则必须将其包装在另一个对象中 - _ 视图对象 _。有两种视图对象可供选择:
- 类型化数组:允许您将数据作为所有具有相同类型的索引元素序列进行访问。例子包括:
Uint8Array:元素是无符号 8 位整数。 _ 无符号 _ 表示它们的范围从零开始。Int16Array:元素是带符号的 16 位整数。 _ 签名 _ 意味着他们有一个标志,可以是负数,零或正数。Float32Array:元素是 32 位浮点数。
- DataViews:允许您将数据解释为可以在任何字节偏移处读取和写入的各种类型(
Uint8,Int16,Float32等)。
图 19 显示了 API 的类图。
27.1.4. 使用 Typed Arrays
类型数组的使用方式与普通数组非常相似,但有一些显着差异:
- Typed Arrays 将其数据存储在 ArrayBuffers 中。
- 所有元素都用零初始化。
- 所有元素都具有相同的类型。将值写入类型化数组会将它们强制转换为该类型。读取值会产生正常数字。
- 创建类型化数组后,其长度永远不会改变。
- Typed Arrays 不能有洞。
这是使用类型化数组的示例:
const typedArray = new Uint8Array(2); // 2 elements
assert.equal(typedArray.length, 2);
// The wrapped ArrayBuffer
assert.deepEqual(
  typedArray.buffer, new ArrayBuffer(2)); // 2 bytes
// Getting and setting elements:
assert.equal(typedArray[1], 0); // initialized with 0
typedArray[1] = 72;
assert.equal(typedArray[1], 72);
其他创建类型数组的方法:
const ta1 = new Uint8Array([5, 6]);
const ta2 = Uint8Array.of(5, 6);
assert.deepEqual(ta1, ta2);
27.1.5. 使用 DataViews
- 这就是 DataViews 的使用方式:
const dataView = new DataView(new ArrayBuffer(4));
assert.equal(dataView.getUint16(0), 0);
assert.equal(dataView.getUint8(0), 0);
dataView.setUint8(0, 5);
27.2. Typed Array API 的基础
27.2.1. 元素类型
API 支持以下元素类型:
| 元素类型 | 字节 | 描述 | C 型 |
|---|---|---|---|
| INT8 | 1 | 8 位有符号整数 | 签名的 char |
| UINT8 | 1 | 8 位无符号整数 | 无符号的字符 |
| Uint8C | 1 | 8 位无符号整数(钳位转换) | 无符号的字符 |
| INT16 | 2 | 16 位有符号整数 | 短 |
| UINT16 | 2 | 16 位无符号整数 | 未签约的短片 |
| INT32 | 4 | 32 位有符号整数 | INT |
| UINT32 | 4 | 32 位无符号整数 | unsigned int |
| FLOAT32 | 4 | 32 位浮点 | 浮动 |
| Float64 | 8 | 64 位浮点 | 双 |
元素类型Uint8C是特殊的:DataView不支持它,仅存在以启用Uint8ClampedArray。这个类型数组由canvas元素使用(它替换CanvasPixelArray)。 Uint8C和Uint8之间的唯一区别是溢出和下溢的处理方式(如下一节所述)。建议避免前者 - 引用 Brendan Eich :
只是为了超级清晰(我出生时就在身边),
Uint8ClampedArray完全是一个历史神器(HTML5 画布元素)。除非你真的在做帆布的事情,否则要避免。
27.2.2. 处理溢出和下溢
通常,当值超出元素类型的范围时,使用模运算将其转换为范围内的值。对于有符号和无符号整数,这意味着:
- 最高值加 1 将转换为最低值(0 表示无符号整数)。
- 最低值减 1 将转换为最高值。
以下功能有助于说明转换的工作原理:
-
function setAndGet(typedArray, value) { typedArray[0] = value; return typedArray[0]; } - 无符号 8 位整数的模数转换:
const uint8 = new Uint8Array(1); // Highest value of range assert.equal(setAndGet(uint8, 255), 255); // Overflow assert.equal(setAndGet(uint8, 256), 0); // Lowest value of range assert.equal(setAndGet(uint8, 0), 0); // Underflow assert.equal(setAndGet(uint8, -1), 255); - 有符号 8 位整数的模数转换:
const int8 = new Int8Array(1);
// Highest value of range
assert.equal(setAndGet(int8, 127), 127);
// Overflow
assert.equal(setAndGet(int8, 128), -128);
// Lowest value of range
assert.equal(setAndGet(int8, -128), -128);
// Underflow
assert.equal(setAndGet(int8, -129), 127);
夹紧转换是不同的:
- 所有下溢值都将转换为最低值。
- 所有溢出值都将转换为最高值。
const uint8c = new Uint8ClampedArray(1);
// Highest value of range
assert.equal(setAndGet(uint8c, 255), 255);
// Overflow
assert.equal(setAndGet(uint8c, 256), 255);
// Lowest value of range
assert.equal(setAndGet(uint8c, 0), 0);
// Underflow
assert.equal(setAndGet(uint8c, -1), 0);
27.2.3. 字节序
每当一个类型(例如Uint16)被存储为多个字节的序列时, endianness 很重要:
- Big endian:最重要的字节首先出现。例如,
Uint16值 0x4321 存储为两个字节 - 首先是 0x43,然后是 0x21。 - 小端:最不重要的字节首先出现。例如,
Uint16值 0x4321 存储为两个字节 - 首先是 0x21,然后是 0x43。
Endianness 往往是针对每个 CPU 架构固定的,并且在本机 API 之间保持一致。类型化数组用于与这些 API 通信,这就是为什么它们的字节顺序遵循平台的字节顺序而无法更改。另一方面,协议和二进制文件的字节顺序各不相同,并且在不同平台上是固定的。因此,我们必须能够以任何字节顺序访问数据。 DataViews 提供此用例,并允许您在获取或设置值时指定字节序。引用关于 Endianness 的维基百科:
- Big-endian 表示是数据网络中最常见的惯例; Internet 协议套件协议中的字段,如 IPv4,IPv6,TCP 和 UDP,以 big-endian 顺序传输。因此,big-endian 字节顺序也称为网络字节顺序。
- 小端存储器在微处理器中很受欢迎,部分原因是英特尔公司对微处理器设计产生了重大的历史影响。
您可以使用以下函数来确定平台的字节顺序。
const BIG_ENDIAN = Symbol('BIG_ENDIAN');
const LITTLE_ENDIAN = Symbol('LITTLE_ENDIAN');
function getPlatformEndianness() {
  const arr32 = Uint32Array.of(0x87654321);
  const arr8 = new Uint8Array(arr32.buffer);
  if (compare(arr8, [0x87, 0x65, 0x43, 0x21])) {
    return BIG_ENDIAN;
  } else if (compare(arr8, [0x21, 0x43, 0x65, 0x87])) {
    return LITTLE_ENDIAN;
  } else {
    throw new Error('Unknown endianness');
  }
}
function compare(arr1, arr2) {
  if (arr1.length !== arr2.length) {
    return false;
  }
  for (let i=0; i<arr1.length; i++) {
    if (arr1[i] !== arr2[i]) {
      return false;
    }
  }
  return true;
}
其他排序也是可能的。这些通常被称为 _ 中端 _ 或 _ 混合端 _。
27.2.4. 指数和抵消
- 对于 Typed Arrays,我们区分:
- 括号运算符的指数
[ ]:您只能使用非负指数(从 0 开始)。 - ArrayBuffers,Typed Arrays 和 DataViews 方法的索引:每个索引都可以是负数。如果是,则将其添加到实体的长度,以生成实际索引。因此,
-1指的是最后一个元素,-2指向倒数第二个等。正常数组的方法以相同的方式工作。const ui8 = Uint8Array.of(0, 1, 2); assert.deepEqual(ui8.slice(-1), Uint8Array.of(2)); - 传递给 Typed Arrays 和 DataViews 方法的偏移量:必须是非负数。例如:
const dataView = new DataView(new ArrayBuffer(4));
assert.throws(
  () => dataView.getUint8(-1),
  {
    name: 'RangeError',
    message: 'Offset is outside the bounds of the DataView',
  });
- 括号运算符的指数
27.3. ArrayBuffers
ArrayBuffers 存储二进制数据,可通过 Typed Arrays 和 DataViews 访问。
27.3.1. new ArrayBuffer()
- 构造函数的类型签名是:
new ArrayBuffer(length: number) - 通过
new调用此构造函数会创建一个容量为length字节的实例。每个字节最初为 0。您无法更改 ArrayBuffer 的长度,您只能创建一个具有不同长度的新长度。
27.3.2. ArrayBuffer的静态方法
ArrayBuffer.isView(arg: any)如果arg是对象,则返回true,返回 ArrayBuffer(Typed Array 或 DataView)的视图。
27.3.3. ArrayBuffer.prototype的属性
get .byteLength(): number以字节为单位返回此 ArrayBuffer 的容量。.slice(startIndex: number, endIndex=this.byteLength)创建一个新的 ArrayBuffer,其中包含此 ArrayBuffer 的字节,其索引大于或等于startIndex且小于endIndex。start和endIndex可以是负数。
27.4. 键入的数组
各种类型的数组只是不同的 w.r.t.他们的元素类型:
- 元素为整数的类型化数组:
Int8Array,Uint8Array,Uint8ClampedArray,Int16Array,Uint16Array,Int32Array,Uint32Array - 元素为浮点数的类型数组:
Float32Array,Float64Array
27.4.1. 键入数组与普通数组
类型数组与普通数组非常相似:它们有.length,元素可以通过括号运算符[ ]访问,并且它们具有大多数标准数组方法。它们在以下方面与普通数组不同:
- Typed Arrays 有缓冲区。类型数组
ta的元素不存储在ta中,它们存储在可通过ta.buffer访问的关联 ArrayBuffer 中:const ta = new Uint8Array(4); // 4 elements assert.deepEqual( ta.buffer, new ArrayBuffer(4)); // 4 bytes - 使用零初始化类型化数组:
new Array(4)创建一个没有任何元素的普通数组。它只有 4 个 _ 孔 _(小于.length的指数没有相关元素)。new Uint8Array(4)创建一个 Typed Array,其中 4 个元素都为 0。
assert.deepEqual(new Uint8Array(4), Uint8Array.of(0, 0, 0, 0)); - Typed Array 的所有元素都具有相同的类型:
- 设置元素将值转换为该类型。
const ta = new Uint8Array(1); ta[0] = 256; assert.equal(ta[0], 0); ta[0] = '2'; assert.equal(ta[0], 2); - 获取元素返回数字。
const ta = new Uint8Array(1);
assert.equal(ta[0], 0);
assert.equal(typeof ta[0], 'number');
- 设置元素将值转换为该类型。
- Typed Array 的
.length派生自其 ArrayBuffer 并且永远不会更改(除非您切换到不同的 ArrayBuffer)。 - 普通数组可以有孔;键入的数组不能。
27.4.2. 类型化数组是可迭代的
类型数组是可迭代的。这意味着您可以使用for-of循环和类似的机制:
const ui8 = Uint8Array.of(0,1,2);
for (const byte of ui8) {
  console.log(byte);
}
// Output:
// 0
// 1
// 2
ArrayBuffers 和 DataViews 不可迭代。
27.4.3. 将类型化数组转换为普通数组
- 要将普通数组转换为类型化数组,请将其传递给类型化数组构造函数。例如:
const tarr = new Uint8Array([0,1,2]); - 要将 Typed Array 转换为普通 Array,可以使用 spread 或
Array.from()(因为 Typed Arrays 是可迭代的):assert.deepEqual([...tarr], [0,1,2]); assert.deepEqual(Array.from(tarr), [0,1,2]);
27.4.4. Typed Arrays 的类层次结构
各种 Typed Array 对象的属性分两步介绍:
TypedArray:首先,我们看一下所有 Typed Array 类的公共超类(在本章开头的类图中显示)。我正在调用超类TypedArray,但它不能直接从 JavaScript 访问。TypedArray.prototype包含 Typed Arrays 的所有方法。«ElementType»Array:实际的 Typed Array 类称为Uint8Array,Int16Array,Float32Array等。
27.4.5. TypedArray的静态方法
静态TypedArray方法都由其子类(Uint8Array等)继承。
27.4.5.1. TypedArray.of()
- 此方法具有类型签名:
.of(...items: number[]): instanceof this - 返回类型的表示法是我的发明:
.of()返回this的实例(调用of()的类)。实例的元素是of()的参数。 - 您可以将
of()视为 Typed Arrays 的自定义字面值:const float32Arr = Float32Array.of(0.151, -8, 3.7); const int16Arr = Int32Array.of(-10, 5, 7);
27.4.5.2. TypedArray.from()
- 此方法具有类型签名:
TypedArray<T>.from<S>( source: Iterable<S>|ArrayLike<S>, mapfn?: S => T, thisArg?: any) : instanceof this - 它将
source转换为this(类型化数组)的实例。再一次,语法instanceof this是我的发明。 - 例如,普通数组是可迭代的,可以使用此方法转换:
assert.deepEqual( Uint16Array.from([0, 1, 2]), Uint16Array.of(0, 1, 2)); - 类型化数组也是可迭代的:
assert.deepEqual( Uint16Array.from(Uint8Array.of(0, 1, 2)), Uint16Array.of(0, 1, 2)); source也可以是类似于数组的对象:assert.deepEqual( Uint16Array.from({0:0, 1:1, 2:2, length: 3}), Uint16Array.of(0, 1, 2));
可选的mapfn允许您在source成为结果元素之前对其进行转换。为什么一次执行两个步骤 _ 映射 _ 和 _ 转换 _?与通过.map()单独映射相比,有两个优点:
- 不需要中间数组或类型数组。
- 在具有不同精度的类型化数组之间进行转换时,可能会出现更少的错误。
为了说明第二个优点,我们首先将 Typed 数组转换为具有更高精度的 Typed 数组。如果我们使用.from()进行映射,结果会自动更正。否则,您必须先转换然后映射。
const typedArray = Int8Array.of(127, 126, 125);
assert.deepEqual(
  Int16Array.from(typedArray, x => x * 2),
  Int16Array.of(254, 252, 250));
assert.deepEqual(
  Int16Array.from(typedArray).map(x => x * 2),
  Int16Array.of(254, 252, 250)); // OK
assert.deepEqual(
  Int16Array.from(typedArray.map(x => x * 2)),
  Int16Array.of(-2, -4, -6)); // wrong
如果我们从类型化数组转换为具有较低精度的类型化数组,则通过.from()进行映射会产生正确的结果。否则,我们必须首先映射然后转换。
assert.deepEqual(
  Int8Array.from(Int16Array.of(254, 252, 250), x => x / 2),
  Int8Array.of(127, 126, 125));
assert.deepEqual(
  Int8Array.from(Int16Array.of(254, 252, 250).map(x => x / 2)),
  Int8Array.of(127, 126, 125)); // OK
assert.deepEqual(
  Int8Array.from(Int16Array.of(254, 252, 250)).map(x => x / 2),
  Int8Array.of(-1, -2, -3)); // wrong
问题是,如果我们通过.map()进行映射,那么输入类型和输出类型是相同的(如果我们使用 Typed Arrays)。相反,.from()从任意输入类型变为您通过其接收器指定的输出类型。根据 Allen Wirfs-Brock ,Typed Arrays 之间的映射是.from()的mapfn参数的动机。
27.4.6. TypedArray<T>.prototype的属性
Typed Array 方法接受的索引可能是否定的(它们就像传统的 Array 方法一样)。偏移必须是非负的。
27.4.6.1. Typed Arrays 特有的属性
以下属性特定于 Typed Arrays;普通数组没有它们:
get .buffer(): ArrayBuffer返回支持此 Typed Array 的缓冲区。get .length(): number返回此 Typed Array 缓冲区元素的长度。请注意,普通数组的长度不是 getter,它是实例具有的特殊属性。get .byteLength(): number返回此 Typed Array 缓冲区的大小(以字节为单位)。get .byteOffset(): number返回此 Arrayd Array 在其 ArrayBuffer 中“启动”的偏移量。.set(arrayLike: ArrayLike<number>, offset=0): void.set(typedArray: TypedArray, offset=0): void将第一个参数的所有元素复制到此 Typed 数组。参数索引 0 处的元素被写入此类型数组的索引offset(等)。- 第一个参数是
arrayLike:它的元素被转换为数字,然后转换为此类型数组的元素类型T。 - 第一个参数是
typedArray:它的每个元素都直接转换为此类型数组的相应类型。如果两个 Typed Arrays 具有相同的元素类型然后更快,则使用逐字节复制。
- 第一个参数是
.subarray(startIndex=0, end=this.length): TypedArray<T>返回一个新的 Typed Array,它与此 Typed Array 具有相同的缓冲区,但是(通常)较小的范围。如果startIndex为非负数,则生成的类型化数组的第一个元素为this[startIndex],第二个this[startIndex+1](等)。如果startIndex为负数,则进行适当转换。
27.4.6.2. 数组方法
以下方法与普通数组的方法基本相同:
.copyWithin(target: number, start: number, end=this.length): this^[W,ES6]^.entries(): Iterable<[number, T]>^[R,ES6]^.every(callback: (value: T, index: number, array: TypedArray<T>) => boolean, thisArg?: any): boolean^[R,ES5]^.fill(value: T, start=0, end=this.length): this^[W,ES6]^.filter(callback: (value: T, index: number, array: TypedArray<T>) => any, thisArg?: any): T[]^[R,ES5]^.find(predicate: (value: T, index: number, obj: T[]) => boolean, thisArg?: any): T | undefined^[R,ES6]^.findIndex(predicate: (value: T, index: number, obj: T[]) => boolean, thisArg?: any): number^[R,ES6]^.forEach(callback: (value: T, index: number, array: TypedArray<T>) => void, thisArg?: any): void^[R,ES5]^.includes(searchElement: T, fromIndex=0): boolean^[R,ES2016]^.indexOf(searchElement: T, fromIndex=0): number^[R,ES5]^.join(separator = ','): string^[R,ES1]^.keys(): Iterable<number>^[R,ES6]^.lastIndexOf(searchElement: T, fromIndex=this.length-1): number^[R,ES5]^.map<U>(mapFunc: (value: T, index: number, array: TypedArray<T>) => U, thisArg?: any): U[]^[R,ES5]^.reduce<U>(callback: (accumulator: U, element: T, index: number, array: T[]) => U, init?: U): U^[R,ES5]^.reduceRight<U>(callback: (accumulator: U, element: T, index: number, array: T[]) => U, init?: U): U^[R,ES5]^.reverse(): this^[W,ES1]^.slice(start=0, end=this.length): T[]^[R,ES3]^.some(callback: (value: T, index: number, array: TypedArray<T>) => boolean, thisArg?: any): boolean^[R,ES5]^.sort(compareFunc?: (a: T, b: T) => number): this^[W,ES1]^.toString(): string^[R,ES1]^.values(): Iterable<number>^[R,ES6]^
有关这些方法如何工作的详细信息,请参阅 26.数组 章节。
27.4.7. new «ElementType»Array()
每个 Typed Array 构造函数的名称都遵循模式«ElementType»Array,其中«ElementType»是开头表格中的元素类型之一。这意味着有 9 个类型数组的构造函数:Int8Array,Uint8Array,Uint8ClampedArray(元素类型Uint8C),Int16Array,Uint16Array,Int32Array,Uint32Array,Float32Array, Float64Array。
每个构造函数都有四个 _ 重载 _ 版本 - 它的行为会有所不同,具体取决于它接收的参数数量以及它们的类型:
new «ElementType»Array(buffer: ArrayBuffer, byteOffset=0, length=0)创建一个新的«ElementType»Array,其缓冲区为buffer。它开始访问给定byteOffset的缓冲区,并具有给定的length。请注意,length计算 Typed Array 的元素(每个 1-4 字节),而不是字节。new «ElementType»Array(length=0)使用给定的length和相应的缓冲区(其大小以字节为length * «ElementType»Array.BYTES_PER_ELEMENT)创建新的«ElementType»Array。new «ElementType»Array(source: TypedArray)创建«ElementType»Array的新实例,其元素与source的元素具有相同的值,但强制为ElementType。new «ElementType»Array(source: ArrayLike<number>)创建«ElementType»Array的新实例,其元素与source的元素具有相同的值,但强制为ElementType。 (有关类似数组的对象的更多信息,请参阅 26.数组 章节。)
以下代码显示了创建相同 Typed 数组的三种不同方法:
const ta1 = new Uint8Array([0, 1, 2]);
const ta2 = Uint8Array.of(0, 1, 2);
const ta3 = new Uint8Array(3);
ta3[0] = 0;
ta3[1] = 1;
ta3[2] = 2;
assert.deepEqual(ta1, ta2);
assert.deepEqual(ta1, ta3);
27.4.8. «ElementType»Array的静态属性
«ElementType»Array.BYTES_PER_ELEMENT: number计算存储单个元素需要多少字节:> Uint8Array.BYTES_PER_ELEMENT 1 > Int16Array.BYTES_PER_ELEMENT 2 > Float64Array.BYTES_PER_ELEMENT 8
27.4.9. «ElementType»Array.prototype的属性
.BYTES_PER_ELEMENT: number与«ElementType»Array.BYTES_PER_ELEMENT相同。
27.4.10. 连接类型数组
- 类型数组没有方法
.concat(),就像普通数组那样。解决方法是使用该方法.set(typedArray: TypedArray, offset=0): void - 该方法将现有的 Typed Array 复制到索引
offset的typedArray中。然后你只需要确保typedArray足够大以容纳你想要连接的所有(Typed)数组:function concatenate(resultConstructor, ...arrays) { let totalLength = 0; for (const arr of arrays) { totalLength += arr.length; } const result = new resultConstructor(totalLength); let offset = 0; for (const arr of arrays) { result.set(arr, offset); offset += arr.length; } return result; } assert.deepEqual( concatenate(Uint8Array, Uint8Array.of(1, 2), [3, 4]), Uint8Array.of(1, 2, 3, 4) );
27.5. DataViews 的
27.5.1. new DataView()
new DataView(buffer: ArrayBuffer, byteOffset=0, byteLength=buffer.byteLength-byteOffset)创建一个新的 DataView,其数据存储在 ArrayBufferbuffer中。默认情况下,新的 DataView 可以访问所有buffer,最后两个参数允许您更改它。
27.5.2. DataView.prototype的属性
«ElementType»可以是:Float32,Float64,Int8,Int16,Int32,Uint8,Uint16,Uint32。
get .buffer()返回此 DataView 的 ArrayBuffer。get .byteLength()返回此 DataView 可以访问的字节数。get .byteOffset()返回此 DataView 开始访问其缓冲区中的字节的偏移量。.get«ElementType»(byteOffset: number, littleEndian=false)从此 DataView 的缓冲区中读取值。.set«ElementType»(byteOffset: number, value: number, littleEndian=false)将value写入此 DataView 的缓冲区。
27.6. 进一步阅读
- 有关支持 Typed Arrays 的浏览器 API 的更多详细信息
- 一个现实世界的例子
- 还有一些技术细节。