发布到 Maven 中央仓库
将 jar 包发布到 Maven 中央仓库(Maven Central Repository),这样所有的 Java 开发者都可以使用 Maven 直接导入依赖,例如fundebug-java:
<!-- https://mvnrepository.com/artifact/com.fundebug/fundebug-java -->
<dependency>
    <groupId>com.fundebug</groupId>
    <artifactId>fundebug-java</artifactId>
    <version>0.2.0</version>
</dependency>Copy to clipboardErrorCopied
但是,Maven 中央仓库并不支持直接发布 jar 包。我们需要将 jar 包发布到一些指定的第三方 Maven 仓库,然后该仓库再将 jar 包同步到 Maven 中央仓库。
其中,最”简单”的方式是通过Sonatype OSSRH仓库来发布 jar 包。接下来,我会介绍如何将 jar 包发布到 Sonatype OSSRH。
本教程所使用的系统配置如下:
- OS:macOS 10.14.2
- JDK:1.8.0_192
- Maven:3.5.4
1. 注册 JIRA 账号
- JIRA 是一个项目管理服务,类似于国内的 Teambition。Sonatype 通过 JIRA 来管理 OSSRH 仓库。
- 注册地址:https://issues.sonatype.org/secure/Signup!default.jspa
- 需要填写 Email, Full Name, Username 以及 password,其中Username 与 Password 后面的步骤需要用到 ,请记下来。
2. 创建 issue
通过在 JIRA 上创建 issue 来申请发布新的 jar 包,Sonatype 的工作人员会进行审核,审核不算严格,一般按照要求填写不会有问题。
创建链接:https://issues.sonatype.org/secure/CreateIssue.jspa?issuetype=21&pid=10134
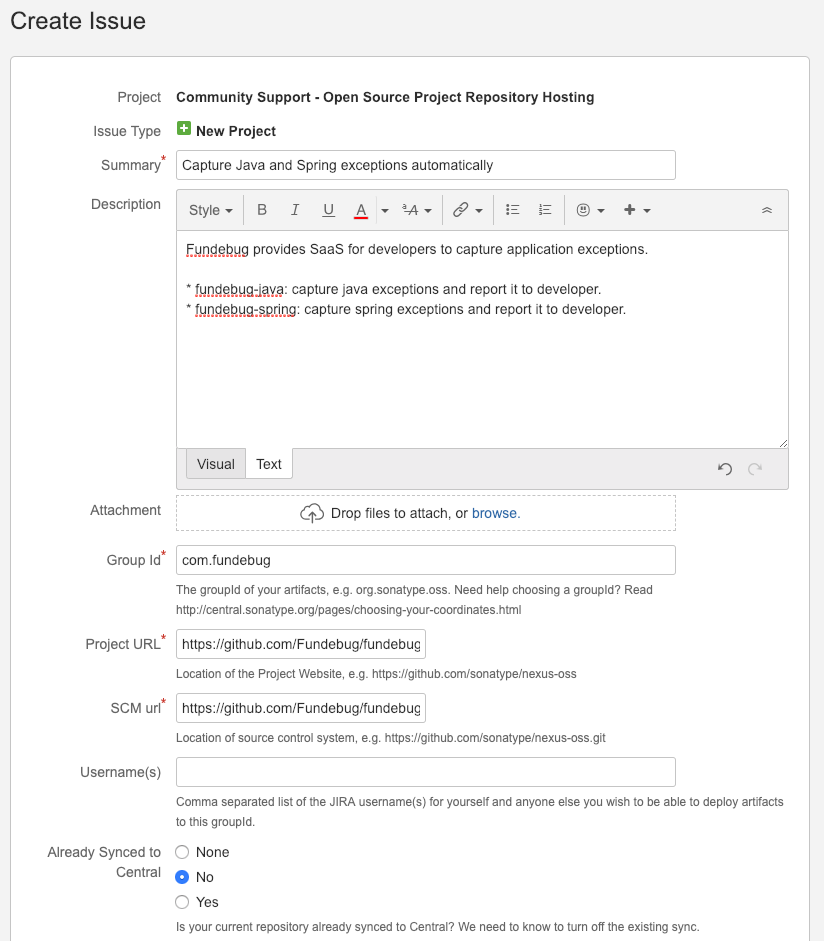
创建 issue 的时候需要填写下面这些信息:
- Summary
- Description
- Group Id
- Project URL
- SCM url
大家可以参考我申请发布fundebug-java与fundebug-spring时所填写的内容:OSSRH-45238 由于时差,前一天创建 issue,第二天早上才会有回应。当 issue 的 status 变为RESOLVED ,我们就可以进行下一步操作了。
3. 安装并配置 GPG
发布到 Maven 仓库中的所有文件都要使用 GPG 签名,以保障完整性。因此,我们需要在本地安装并配置 GPG。
- 安装 GPG
- MacBook 安装 GPG 非常简单,下载并安装GPG Suite即可。
- 生成 GPG 密钥对
gpg --gen-keyCopy to clipboardErrorCopied- 生成密钥时将需要输入 name、email 以及 password。password 在之后的步骤需要用到 ,请记下来。
- 上传 GPG 公钥
- 将公钥上传到公共的密钥服务器,这样其他人才可以通过公钥来验证 jar 包的完整性。
gpg --keyserver hkp://keyserver.ubuntu.com:11371 --send-keys CAB4165C69B699D989D2A62BD74A11D3F9F41243Copy to clipboardErrorCopied - 其中CAB4165C69B699D989D2A62BD74A11D3F9F41243 为密钥的 ID,可以通过gpg –list-keys 命令查看
gpg --list-keys
/Users/kiwenlau/.gnupg/pubring.kbx
----------------------------------
pub   dsa2048 2010-08-19 [SC] [expires: 2020-06-15]
      85E38F69046B44C1EC9FB07B76D78F0500D026C4
uid           [ unknown] GPGTools Team <team@gpgtools.org>
sub   elg2048 2010-08-19 [E] [expires: 2020-06-15]
sub   rsa4096 2014-04-08 [S] [expires: 2024-01-02]
pub   rsa2048 2019-01-03 [SC] [expires: 2021-01-02]
      CAB4165C69B699D989D2A62BD74A11D3F9F41243
uid           [ultimate] kiwenlau <kiwenlau@gmail.com>
sub   rsa2048 2019-01-03 [E] [expires: 2021-01-02]Copy to clipboardErrorCopied
- 将公钥上传到公共的密钥服务器,这样其他人才可以通过公钥来验证 jar 包的完整性。
4. 配置 Maven 的 setting.xml
setting.xml为 Maven 的全局配置文件,在 MacBook 上的位置为 /usr/local/Cellar/maven/3.5.4/libexec/conf/settings.xml ,我们需要将 第 1 步 配置的 Username 和 Password 添加到username 和 password 标签中,这样我们才能将 jar 包部署到 Sonatype OSSRH 仓库:
<servers>
        <server>
                <id>ossrh</id>
                <username>Fundebug</username>
                <password>passsword</password>
        </server>
</servers>Copy to clipboardErrorCopied
5. 配置项目的 pom.xml
pom.xml 挺长的。根据 Sonatype OSSRH 的要求,以下信息都必须配置:
- Supply Javadoc and Sources
- Sign Files with GPG/PGP
- Sufficient Metadata
- Correct Coordinates
- Project Name, Description and URL
- License Information
- Developer Information
- SCM Information
配置时参考我的 pom.xml,根据需要修改即可。
<project xmlns="http://maven.apache.org/POM/4.0.0"
    xmlns:xsi="http://www.w3.org/2001/XMLSchema-instance" xsi:schemaLocation="http://maven.apache.org/POM/4.0.0 http://maven.apache.org/xsd/maven-4.0.0.xsd">
    <modelVersion>4.0.0</modelVersion>
    <groupId>com.fundebug</groupId>
    <artifactId>fundebug-java-notifier</artifactId>
    <version>0.2.0</version>
    <packaging>pom</packaging>
    <name>fundebug-java-notifier</name>
    <url>https://github.com/Fundebug/fundebug-java-notifier</url>
    <description>Capture Java and Spring exceptions automatically</description>
    <licenses>
        <license>
            <name>Server Side Public License</name>
            <url>https://www.mongodb.com/licensing/server-side-public-license</url>
            <distribution>repo</distribution>
            <comments>A not business-friendly OSS license</comments>
        </license>
    </licenses>
    <scm>
        <url>https://github.com/Fundebug/fundebug-java-notifier</url>
        <connection>https://github.com/Fundebug/fundebug-java-notifier.git</connection>
    </scm>
    <properties>
        <maven.compiler.source>1.8</maven.compiler.source>
        <maven.compiler.target>1.8</maven.compiler.target>
        <maven.deploy.skip>true</maven.deploy.skip>
    </properties>
    <developers>
        <developer>
            <name>kiwenlau</name>
            <id>kiwenlau</id>
            <email>kiwenlau@gmail.com</email>
            <roles>
                <role>Developer</role>
            </roles>
            <timezone>+8</timezone>
        </developer>
    </developers>
    <profiles>
        <profile>
            <id>default</id>
            <activation>
                <activeByDefault>true</activeByDefault>
            </activation>
            <build>
                <plugins>
                    <plugin>
                        <groupId>org.apache.maven.plugins</groupId>
                        <artifactId>maven-source-plugin</artifactId>
                        <version>2.2.1</version>
                        <executions>
                            <execution>
                                <phase>package</phase>
                                <goals>
                                    <goal>jar-no-fork</goal>
                                </goals>
                            </execution>
                        </executions>
                    </plugin>
                    <plugin>
                        <groupId>org.apache.maven.plugins</groupId>
                        <artifactId>maven-javadoc-plugin</artifactId>
                        <version>2.9.1</version>
                        <executions>
                            <execution>
                                <phase>package</phase>
                                <goals>
                                    <goal>jar</goal>
                                </goals>
                            </execution>
                        </executions>
                    </plugin>
                    <plugin>
                        <groupId>org.apache.maven.plugins</groupId>
                        <artifactId>maven-gpg-plugin</artifactId>
                        <version>1.6</version>
                        <executions>
                            <execution>
                                <phase>verify</phase>
                                <goals>
                                    <goal>sign</goal>
                                </goals>
                            </execution>
                        </executions>
                    </plugin>
                </plugins>
            </build>
            <distributionManagement>
                <snapshotRepository>
                    <id>ossrh</id>
                    <url>https://oss.sonatype.org/content/repositories/snapshots/</url>
                </snapshotRepository>
                <repository>
                    <id>ossrh</id>
                    <url>https://oss.sonatype.org/service/local/staging/deploy/maven2/</url>
                </repository>
            </distributionManagement>
        </profile>
    </profiles>
    <modules>
        <module>fundebug-java</module>
        <module>fundebug-spring</module>
        <module>examples/hello-world</module>
        <module>examples/spring-rest-api</module>
    </modules>
</project>Copy to clipboardErrorCopied
6. 发布 jar 包
执行mvn clean deploy 处理,即可将 jar 包发布到 Sonatype OSSRH 仓库。
mvn clean deploy -projects fundebug-java,fundebug-springCopy to clipboardErrorCopied
我们的项目fundebug-java-notifier含有多个模块,仅需部署 fundebug-java 与 fundebug-spring,因此使用 -projects 选项来指定。
第一次执行mvn clean deploy 命令时,需要输入 GPG 密钥的密码。mvn clean deploy 命令执行成功的输出是这样的(部分日志):
[INFO] ------------------------------------------------------------------------
[INFO] Reactor Summary:
[INFO]
[INFO] fundebug-java 0.2.0 ................................ SUCCESS [ 22.183 s]
[INFO] fundebug-spring 0.2.0 .............................. SUCCESS [ 16.383 s]
[INFO] ------------------------------------------------------------------------
[INFO] BUILD SUCCESS
[INFO] ------------------------------------------------------------------------
[INFO] Total time: 38.728 s
[INFO] Finished at: 2019-01-12T20:10:16+08:00
[INFO] ------------------------------------------------------------------------Copy to clipboardErrorCopied
7. close 并 release
mvn clean deploy 命令执行成功,使用 JIRA 账号登陆:https://oss.sonatype.org/#stagingRepositories,就可以看到你所发布的jar包了:
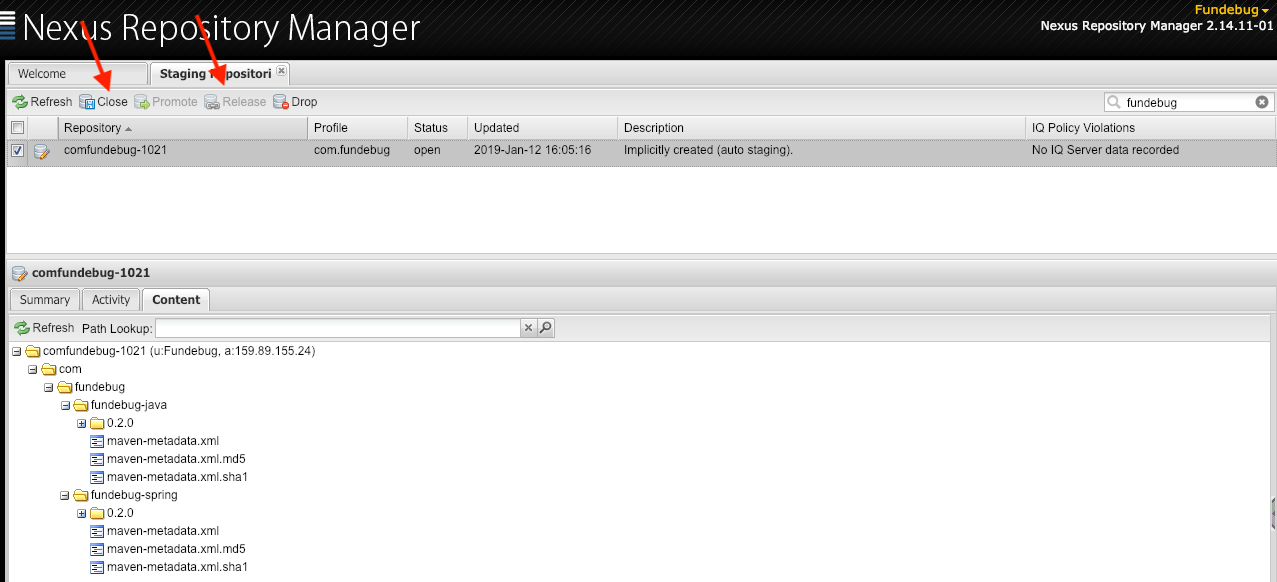
选中对于的 repository 之后,点击箭头所指的close ,close 时会检查发布的构件是否符合要求。若符合要求,则 close 成功,成功之后点击箭头所指的release ,即可正式将 jar 包发布到 Sonatype OSSRH 仓库。
release 成功大概 2 个小时之后,该构件就会同步到Maven 中央仓库:

应用执行
通常我们在使用 Maven 管理项目的时候,都希望直接使用 Maven 插件的方法来管理我们的代码,以及运行。最常用的一个功能就是运行一个主类:希望测试一个主类的输出,但是这个主类又依赖的很多的第三方的 jar 包,直接使用 Java 添加第三方的 jar 到对应的 classPath 下非常不方便。
命令行中执行
如果需要在 Maven 中直接运行某个类中的 Main 方法,可以直接在命令行中指定:
mvn exec:java -Dexec.mainClass="com.example.Main"
mvn exec:java -Dexec.mainClass="xxx.xxx.xxx" [-Dexec.args="arg1 arg2 arg3"]Copy to clipboardErrorCopied
exec-maven-plugin
如果是经常使用的话,可以在 pom 文件中添加如下的配置:
<plugin>
  <groupId>org.codehaus.mojo</groupId>
  <artifactId>exec-maven-plugin</artifactId>
  <version>1.2.1</version>
  <executions>
    <execution>
      <goals>
        <goal>java</goal>
      </goals>
    </execution>
  </executions>
  <configuration>
    <mainClass>com.example.Main</mainClass>
    <arguments>
      <argument>foo</argument>
      <argument>bar</argument>
    </arguments>
  </configuration>
</plugin>Copy to clipboardErrorCopied
其更为复杂的配置如下:
<project>
  ...
  <build>
    <plugins>
      <plugin>
        <groupId>org.codehaus.mojo</groupId>
        <artifactId>exec-maven-plugin</artifactId>
        <version>1.6.0</version>
        <executions>
          <execution>
            // 可以添加对应的执行阶段
            <phase>test</phase>
            ...
            <goals>
                // 指定来的 goal为java,表示运行java程序
              <goal>java</goal>
            </goals>
          </execution>
        </executions>
        <configuration>
            // 指定了运行的main class
          <mainClass>com.example.Main</mainClass>
          // 执行运行 main class的参数
          // 其实就是传入main方法的String[]
          <arguments>
            <argument>argument1</argument>
            ...
          </arguments>
          // 运行java的程序的系统参数
          <systemProperties>
            <systemProperty>
              <key>myproperty</key>
              <value>myvalue</value>
            </systemProperty>
            ...
          </systemProperties>
        </configuration>
      </plugin>
    </plugins>
  </build>
   ...
</project>Copy to clipboardErrorCopied
我们也可以指定 Profile:
<profiles>
 <profile>
  <id>my-exec</id>
    ....
    <build>
    <plugins>
      <plugin>
        <groupId>org.codehaus.mojo</groupId>
        <artifactId>exec-maven-plugin</artifactId>
        <version>1.6.0</version>
        <executions>
          <execution>
            // 可以添加对应的执行阶段
            // 也可以不添加执行阶段,使用mvn exec:exec运行
            <phase>test</phase>
            ...
            <goals>
                // 指定来的 goal为java,表示运行java程序
              <goal>java</goal>
            </goals>
          </execution>
        </executions>
        <configuration>
            // 指定了运行的main class
          <mainClass>com.example.Main</mainClass>
          // 执行运行 main class的参数
          // 其实就是传入main方法的String[]
          <arguments>
            <argument>argument1</argument>
            ...
          </arguments>
          // 运行java的程序的系统参数
          <systemProperties>
            <systemProperty>
              <key>myproperty</key>
              <value>myvalue</value>
            </systemProperty>
            ...
          </systemProperties>
        </configuration>
      </plugin>
    </plugins>
  </build>
    ....
 </profile>
</profiles>
下一节:SPI:Service Provider Interface,是 JDK 内置的一种服务提供机制。许多开发框架都使用了 Java 的 SPI 机制,如 java.sql.Driver 的 SPI 实现(mysql 驱动、oracle 驱动等)、common-logging 的日志接口实现、dubbo 的扩展实现等等。