一、Config 简介
Spring Cloud Config 分为服务端和客户端,服务端称为分布式配置中心,集中管理配置文件;客户端为各个业务单元,它们会从配置中心获取相关配置。同时 Config 还支持配置热更新,可以在服务不停机的情况下刷新配置。
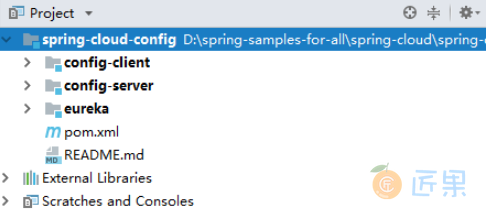
二、项目结构
- config-server :配置中心;
- config-client :服务单元,可以从配置中心获取相关配置;
- eureka :注册中心。
三、配置中心
Config 配置中心的具体实现如下:
3.1 导入依赖
<?xml version="1.0" encoding="UTF-8"?>
<project xmlns="http://maven.apache.org/POM/4.0.0" xmlns:xsi="http://www.w3.org/2001/XMLSchema-instance"
         xsi:schemaLocation="http://maven.apache.org/POM/4.0.0 http://maven.apache.org/xsd/maven-4.0.0.xsd">
    <modelVersion>4.0.0</modelVersion>
    <parent>
        <groupId>com.heibaiying.config</groupId>
        <artifactId>spring-cloud-config</artifactId>
        <version>0.0.1-SNAPSHOT</version>
    </parent>
    <artifactId>config-server</artifactId>
    <dependencies>
        <dependency>
            <groupId>org.springframework.boot</groupId>
            <artifactId>spring-boot-starter-web</artifactId>
        </dependency>
        <dependency>
            <groupId>org.springframework.cloud</groupId>
            <artifactId>spring-cloud-config-server</artifactId>
        </dependency>
        <dependency>
            <groupId>org.springframework.cloud</groupId>
            <artifactId>spring-cloud-starter-netflix-eureka-client</artifactId>
        </dependency>
    </dependencies>
    <build>
        <plugins>
            <plugin>
                <groupId>org.springframework.boot</groupId>
                <artifactId>spring-boot-maven-plugin</artifactId>
            </plugin>
        </plugins>
    </build>
</project>
3.2 添加注解
在启动类上添加 @EnableDiscoveryClient 和 @EnableConfigServer 注解:
@SpringBootApplication
@EnableDiscoveryClient
@EnableConfigServer
public class ConfigServerApplication {
    public static void main(String[] args) {
        SpringApplication.run(ConfigServerApplication.class, args);
    }
}
3.3 项目配置
Spring Cloud Config 支持从 Git 仓库中获取统一的配置文件,具体配置如下:
server:
  port: 8020
# 指定注册中心地址
eureka:
  client:
    serviceUrl:
      defaultZone: http://localhost:8010/eureka/
# 指定服务命名
spring:
  application:
    name: config-server
  cloud:
    config:
      server:
        git:
          uri: https://github.com/heibaiying/spring-samples-for-all/
          search-paths: spring-cloud/spring-cloud-test-config/
          # 如果代码仓库是公开的 则 不需要设置用户名和密码
          username:
          password:
          # 指定拉取的配置文件的存放位置,配置文件最后存储的目录为 basedir + search-paths
          # 这个地方还需要注意的是,配置文件的仓库最好只放配置文件
          # 因为配置中心不仅会拉取 search-paths 下的文件,还会把 uri 指定仓库中的全部文件拉取到 basedir 下
          basedir: D:\git-config
      # 指定分支
      label: master
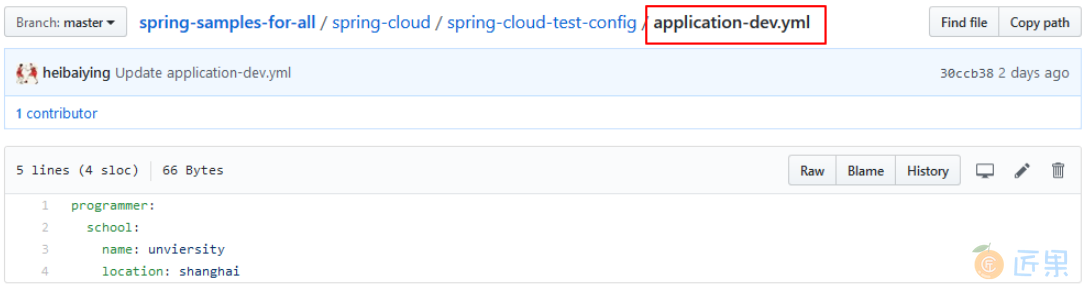
这里的 Git 仓库就是本用例的仓库,是公开的仓库,所以不用配置用户名和密码,配置文件如下:
- application.yml :为主配置;
- application-dev.yml :为开发环境配置。

3.4 启动服务
启动 Eureka 和 Config-Server 服务,访问 http://localhost:8020/application-dev.yml , 此时界面如下:
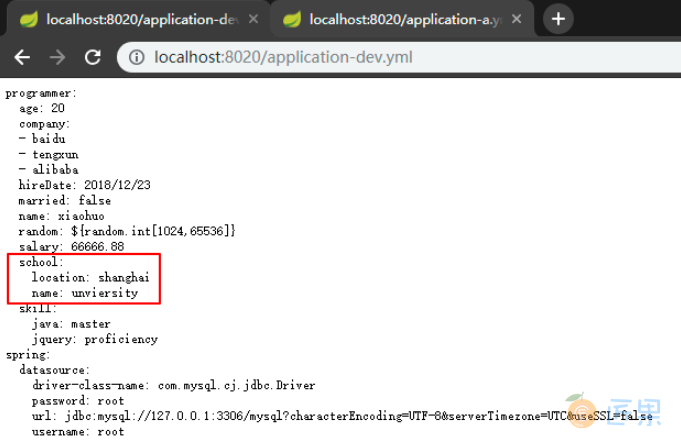
注意此时我们访问是 dev 分支,即开发环境配置,其实际的配置文件的内容如下:
可以看到访问页面的内容远多于实际内容,这说明配置中心自动进行了配置的合并,即 dev 中的实际配置应该是主配置和 dev 配置的结合,且遵循同名属性精确优先的原则,这和我们本地开发时的情况是一致的。
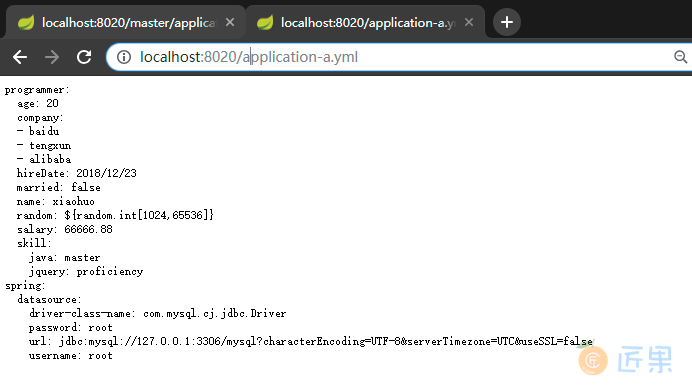
3.5 请求地址映射
在本用例中如果我们想要直接访问主配置,用 http://localhost:8020/application.yml 地址是不行的,会得到错误页面。如果想要访问主配置,,可以用 http://localhost:8020/application-X.yml ,其中 X 可以是任意字符,原因是请求地址和实际的配置文件应该遵循以下的映射规则:
- /{application}/{profile}[/{label}]
- /{application}-{profile}.yml
- /{label}/{application}-{profile}.yml
- /{application}-{profile}.properties
- /{label}/{application}-{profile}.properties
其中 application 为配置文件名,profile 为环境,label 为分支(如果不指定默认就是 master 分支)。从上面的规则中我们可以看出并不存在单独的 /{application} 访问路径,所以必须接上一个任意字符,示例如下:
四、Config 客户端
4.1 导入依赖
<?xml version="1.0" encoding="UTF-8"?>
<project xmlns="http://maven.apache.org/POM/4.0.0" xmlns:xsi="http://www.w3.org/2001/XMLSchema-instance"
         xsi:schemaLocation="http://maven.apache.org/POM/4.0.0 http://maven.apache.org/xsd/maven-4.0.0.xsd">
    <modelVersion>4.0.0</modelVersion>
    <parent>
        <groupId>com.heibaiying.config</groupId>
        <artifactId>spring-cloud-config</artifactId>
        <version>0.0.1-SNAPSHOT</version>
    </parent>
    <artifactId>config-client</artifactId>
    <dependencies>
        <dependency>
            <groupId>org.springframework.boot</groupId>
            <artifactId>spring-boot-starter-web</artifactId>
        </dependency>
        <!--config client-->
        <dependency>
            <groupId>org.springframework.cloud</groupId>
            <artifactId>spring-cloud-starter-config</artifactId>
        </dependency>
        <!--eureka-client-->
        <dependency>
            <groupId>org.springframework.cloud</groupId>
            <artifactId>spring-cloud-starter-netflix-eureka-client</artifactId>
        </dependency>
    </dependencies>
    <build>
        <plugins>
            <plugin>
                <groupId>org.springframework.boot</groupId>
                <artifactId>spring-boot-maven-plugin</artifactId>
            </plugin>
        </plugins>
    </build>
</project>
4.2 bootstrap.yml
新建 bootstrap.yml 配置文件,指定注册中心地址和配置中心服务名,并在启动类上开启自动注册 @EnableDiscoveryClient。这里需要特别说明的是,在之前的所有项目中我们采用的配置文件都是 application.yml,但是这里一定要采用 bootstrap.yml 。两者的区别如下:
- bootstrap.yml ( 或 bootstrap.properties)用来程序引导时执行,应用于更加早期配置信息读取,bootstrap.yml 先于 application.yml 加载。
- application.yml (或 application.properties) 应用程序各个模块的配置信息。
使用 bootstrap.yml 后 ,如果我们的数据库配置放在远程配置中心,那么程序会先去远程配置中心拉取配置,然后再进行数据库的自动化配置,反之如果不使用 bootstrap.yml,就会先进行数据库的自动化配置,此时会因为找不到 url 或驱动而抛出异常。
server:
  port: 8030
spring:
  application:
    name: config-client
  cloud:
    config:
      discovery:
        enabled: true
        # 这里我们指定的是服务名 如果配置中心有多个,且用同一个服务名,我们的客户端拉取配置的时候是负载均衡的,配置中心也就是高可用的
        serviceId: config-server
      # 指定分支
      label: master
      # 指定环境
      profile: dev
# 注意指定注册中心的配置不要从公共配置中拉取,要在本地的配置文件中指定
# 因为我们必须要先从注册中心去获取可用的配置中心, 从配置中心去拉取配置
eureka:
    client:
      serviceUrl:
        defaultZone: http://localhost:8010/eureka/
@SpringBootApplication
@EnableDiscoveryClient
public class ConfigClientApplication {
    public static void main(String[] args) {
        SpringApplication.run(ConfigClientApplication.class, args);
    }
}
4.3 配置映射类
创建配置映射类用于测试:
@Component
@ConfigurationProperties(prefix = "programmer")
@Data
@ToString
public class Programmer{
    private String name;
    private int age;
    private boolean married;
    private Date hireDate;
    private float salary;
    private int random;
    private Map<String, String> skill;
    private List company;
    private School school;
}
@RestController
public class ConfigController {
    @Autowired
    private Programmer programmer;
    @RequestMapping("programmer")
    public String getProgrammer() {
        return programmer.toString();
    }
}
4.4 启动项目
依次启动 eureka,config-server,config-client 三个项目,访问 http://localhost:8030/programmer 。在启动 eureka 和 config-server 后,要稍等一会再启动 config-client,这里是为了确保 config-server 已经将服务注册到 Eureka,然后我们的 config-client 才能从 Eureka 中获取配置中心的服务:

启动时可以从控制台上看到拉取配置的相关信息:
Fetching config from server at : http://localhost:8020/
Located environment: name=config-client, profiles=[dev], label=master, version=50dcfb85cd751e4f28761cd6bad84c1f73034002, state=null
五、实现配置热更新
5.1 消息总线
在微服务的架构中,通常会构建一个可以被所有微服务实例所监听的消息主题,以便对所有微服务实例进行管理和通知,这就是消息总线,Spring Cloud Bus 就是消息总线的一种实现,我们可以使用它来实现配置的热更新。目前 Spring Cloud Bus 支持的消息中间件有 RabbitMQ 和 Kafka, 我们下面的整合采用的是 RabbitMQ。另外关于热更新只需要对配置客户端(config-client)做更改,不需要对 config-server 做改动。
5.2 导入依赖
<dependency>
    <groupId>org.springframework.cloud</groupId>
    <artifactId>spring-cloud-starter-bus-amqp</artifactId>
</dependency>
<!--因为要用到端点功能(主要是刷新端点),所以还需要导入actuator-->
<dependency>
    <groupId>org.springframework.boot</groupId>
    <artifactId>spring-boot-starter-actuator</artifactId>
</dependency>
5.3 修改 bootstrap.yml
修改 bootstrap.yml 配置,开启总线配置,主要是配置 RabbitMQ 和 开启热刷新 端点 :
server:
  port: 8030
spring:
  application:
    name: config-client
  cloud:
    config:
      discovery:
        enabled: true
        # 这里我们指定的是服务名 如果配置中心有多个,且用同一个服务名,
        # 那么我们的客户端拉取配置时会自动负载均衡,此时配置中心也就同时实现了高可用
        serviceId: config-server
      # 指定分支
      label: master
      # 指定环境
      profile: dev
    bus:
      #开启总线
      enabled: true
      # 打开 ack 跟踪的标志(默认关闭)
      trace:
        enabled: true
  # 使用 bus 实现热更新
  rabbitmq:
    host: 127.0.0.1
    port: 5672
    username: guest
    password: guest
# 注意指定注册中心的配置不要从公共配置中拉取,要在本地的配置文件中指定
# 因为我们必须要先从注册中心去获取可用的配置中心, 然后从配置中心去拉取配置
eureka:
    client:
      serviceUrl:
        defaultZone: http://localhost:8010/eureka/
# 暴露热刷新的端点
management:
  endpoints:
    web:
      exposure:
        include: bus-refresh
5.4 @RefreshScope
用 @RefreshScope 指定需要热刷新的配置:
@Component
@ConfigurationProperties(prefix = "programmer")
@Data
@ToString
@RefreshScope // 定义下面配置热刷新范围
public class Programmer{
    private String name;
    private int age;
    private boolean married;
    private Date hireDate;
    private float salary;
    private int random;
    private Map<String, String> skill;
    private List company;
    private School school;
}
5.5 启动项目
依次启动 eureka,config-server,config-client 四个项目,在 config 服务端启动时候,可以在控制台 看到 Bus 自动创建了交换机、队列等组件:
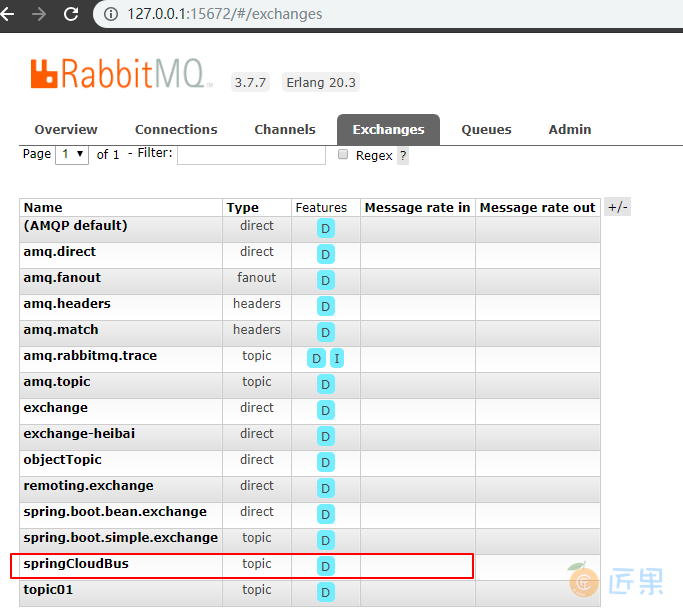
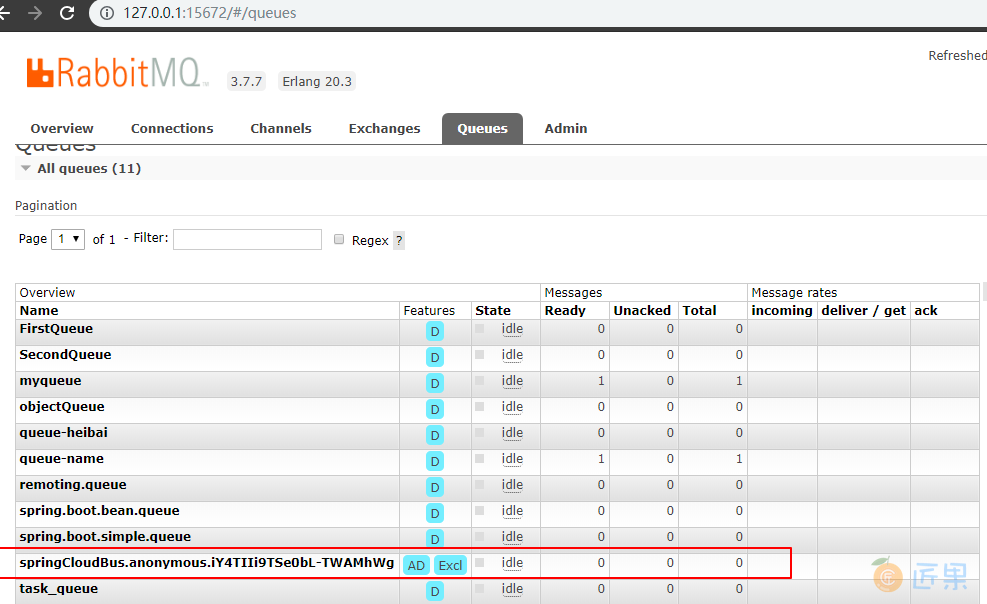
Created new connection: rabbitConnectionFactory#496c6d94:22/SimpleConnection@185d85d2 [delegate=amqp://guest@127.0.0.1:5672/, localPort= 63713]
o.s.amqp.rabbit.core.RabbitAdmin         : Auto-declaring a non-durable, auto-delete, or exclusive Queue (springCloudBus.anonymous.iY4TIIi9TSe0bL-TWAMhWg) durable:false, auto-delete:true, exclusive:true. It will be redeclared if the broker stops and is restarted while the connection factory is alive, but all messages will be lost.
也可以在 RabbitMQ 管控台上查看:
5.6 测试热刷新
直接在 Git 上修改配置文件,然后用 post 请求触发热刷新端点 http://localhost:8030/actuator/bus-refresh ,即可看到配置已经热刷新。注意这里的只能用 post 方式请求 ,你可以用 Postman 等测试软件来发送:

热刷新的过程在控制台上有详细的输出,部分日志如下:
# 消息传播
Attempting to connect to: [127.0.0.1:5672]
Created new connection: rabbitConnectionFactory.publisher#b00f2d6:0/SimpleConnection@403c0406 [delegate=amqp://guest@127.0.0.1:5672/, localPort= 62748]
# 从配置中心拉取配置文件
Fetching config from server at : http://DESKTOP-8JGSFLJ:8020/
# 刷新应用上下文 AnnotationConfigApplicationContext
Refreshing org.springframework.context.annotation.AnnotationConfigApplicationContext@62e12f66