现在我们已经有了 PDF 格式的 JUnit 报告,让我们将其附加到电子邮件中并发送给各个项目利益相关者。 因此,今天我们主要将仅使用 Java。 大家都来一杯咖啡(Java)!
SendMail.java– 此类包含用于发送电子邮件的所有代码。InvokeMail.java– 通过提供从地址到地址,主题行和一些文本来调用SendMail.java。
代码
- SendMail.java
package com.blog.utility; import java.util.Properties; import javax.activation.DataHandler; import javax.activation.DataSource; import javax.activation.FileDataSource; import javax.mail.BodyPart; import javax.mail.Message; import javax.mail.MessagingException; import javax.mail.Multipart; import javax.mail.PasswordAuthentication; import javax.mail.Session; import javax.mail.Transport; import javax.mail.internet.InternetAddress; import javax.mail.internet.MimeBodyPart; import javax.mail.internet.MimeMessage; import javax.mail.internet.MimeMultipart; /* * This class has the main code for sending mail * / public class SendMail { public static void send(String from, String tos[], String subject, String text) throws MessagingException { // Get the session object Properties props = new Properties(); props.put("mail.smtp.host", "smtp.gmail.com"); props.put("mail.smtp.socketFactory.port", "465"); props.put("mail.smtp.socketFactory.class", "javax.net.ssl.SSLSocketFactory"); props.put("mail.smtp.auth", "true"); props.put("mail.smtp.port", "465"); Session session = Session.getDefaultInstance(props, new javax.mail.Authenticator() { protected PasswordAuthentication getPasswordAuthentication() { return new PasswordAuthentication( "[[email protected]](/cdn-cgi/l/email-protection)", "pass1234");// change accordingly } }); // compose message try { MimeMessage message = new MimeMessage(session); message.setFrom(new InternetAddress(from));// change accordingly for (String to : tos) { message.addRecipient(Message.RecipientType.TO, new InternetAddress(to)); } /* * for (String cc : ccs) * message.addRecipient(Message.RecipientType.CC,new * InternetAddress(cc)); * / message.setSubject(subject); // Option 1: To send normal text message // message.setText(text); // Option 2: Send the actual HTML message, as big as you like // message.setContent("<h1>This is actual message</h1></br></hr>" + // text, "text/html"); // Set the attachment path String filename = "E:\\Selenium\\junit.pdf"; BodyPart objMessageBodyPart = new MimeBodyPart(); // Option 3: Send text along with attachment objMessageBodyPart.setContent( "<h1>Mail from Selenium Project!</h1></br>" + text, "text/html"); Multipart multipart = new MimeMultipart(); multipart.addBodyPart(objMessageBodyPart); objMessageBodyPart = new MimeBodyPart(); DataSource source = new FileDataSource(filename); objMessageBodyPart.setDataHandler(new DataHandler(source)); objMessageBodyPart.setFileName(filename); multipart.addBodyPart(objMessageBodyPart); message.setContent(multipart); // send message Transport.send(message); System.out.println("message sent successfully"); } catch (MessagingException e) { throw new RuntimeException(e); } }// End of SEND method } - InvokeMail.java
package com.blog.junitTests;
import javax.mail.MessagingException;
import com.blog.utility.SendMail;
/*
 * Invokes SendMail.java
 * /
public class InvokeMail {
  public static void main(String[] args) throws MessagingException {
    //String to[] = {"[[email protected]](/cdn-cgi/l/email-protection)","[[email protected]](/cdn-cgi/l/email-protection)"};
    String to[] = {"[[email protected]](/cdn-cgi/l/email-protection)"};
    SendMail.send("[[email protected]](/cdn-cgi/l/email-protection)", to, "JUnit Report", "Check the PDF attachment.");
  }
}
解释
直接看一下代码会使我们感到难以接受。 让我们一次了解一个摘要。与往常一样,我们的第一步是下载几个 JAR。
activation.jarjavax.mail-1.6.1.jar
我还将它们都放在了我们的 GitHub 仓库中,以及作为本文一部分处理的所有其他代码文件中。
将这些 JAR 添加到我们的项目构建路径中。 我们之前已经多次看到此程序,因此我不再重复(有关详细说明,请参阅此文章的步骤 3)。
了解SendMail.java,
- 编写所有代码的方法,以便我们可以从任何类轻松地调用它。
public static void send(String from, String tos[], String subject, String text) throws MessagingException {} - 给定的属性仅适用于 Gmail。 如果您根据项目要求使用 Outlook 或任何其他服务,则应相应地进行更改。
Properties props = new Properties(); props.put("mail.smtp.host", "smtp.gmail.com"); props.put("mail.smtp.socketFactory.port", "465"); props.put("mail.smtp.socketFactory.class", "javax.net.ssl.SSLSocketFactory"); props.put("mail.smtp.auth", "true"); props.put("mail.smtp.port", "465"); - 获取会话对象并传递您的电子邮件帐户的凭据(您在地址中提到的凭据)。
Session session = Session.getDefaultInstance(props, new javax.mail.Authenticator() { protected PasswordAuthentication getPasswordAuthentication() { return new PasswordAuthentication("[[email protected]](/cdn-cgi/l/email-protection)","pass1234");// change accordingly } }); - 现在是有趣的部分。 我们将指定“发件人”和“收件人”地址。
如果您只想将此电子邮件发送给一个人,请更改以下代码message.setFrom(new InternetAddress(from)); for (String to : tos) { message.addRecipient(Message.RecipientType.TO, new InternetAddress(to)); }
如果您希望将其发送给抄送给某些人的用户,请按以下所示更改代码message.setFrom(new InternetAddress(from)); message.addRecipient(Message.RecipientType.TO, new InternetAddress(to));message.addRecipient(Message.RecipientType.CC,new InternetAddress(cc)); - 将主题行设置为
message.setSubject(subject); - 要发送:
- 普通短信
message.setText(text); - 实际的 HTML 消息尽可能多
message.setContent("<h1>This is actual message</h1></br></hr>" + text, "text/html"); - 文本和附件(这就是我们想要的)
// Set the attachment path
String filename = "E:\\Selenium\\junit.pdf";
BodyPart objMessageBodyPart = new MimeBodyPart();
objMessageBodyPart.setContent("<h1>Mail from Selenium Project!</h1></br>" + text, "text/html");
Multipart multipart = new MimeMultipart();
multipart.addBodyPart(objMessageBodyPart);
objMessageBodyPart = new MimeBodyPart();
DataSource source = new FileDataSource(filename);
objMessageBodyPart.setDataHandler(new DataHandler(source));
objMessageBodyPart.setFileName(filename);
multipart.addBodyPart(objMessageBodyPart);
message.setContent(multipart);
- 普通短信
- 用简单的一行发送电子邮件,
Transport.send(message);
了解InvokeMail.java,
此类很容易理解,因为我们只是通过提供所有必需的参数从SendMail.java调用“send”方法。
String to[] = {"[[email protected]](/cdn-cgi/l/email-protection)"};
SendMail.send("[[email protected]](/cdn-cgi/l/email-protection)", to, "JUnit Report", "Check the PDF attachment.");
在“运行方式-> Java 应用”下,Eclipse IDE 控制台的输出如下所示,

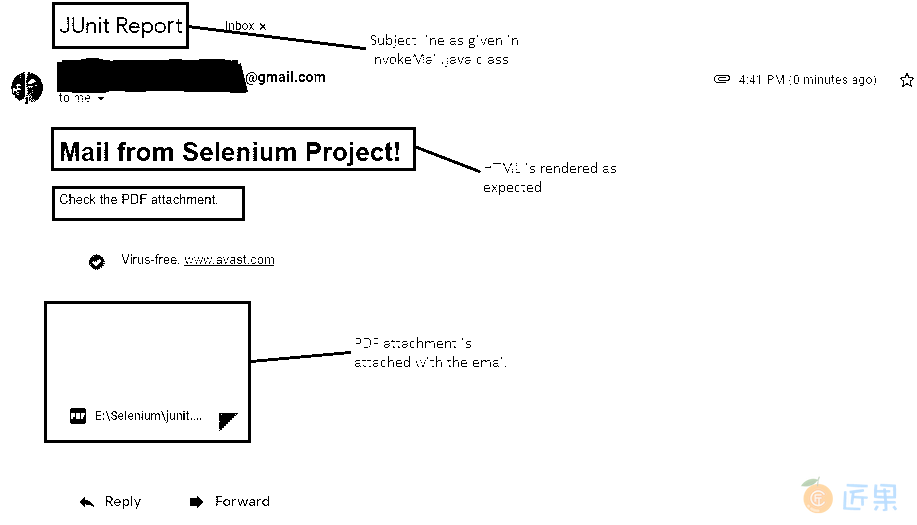
该电子邮件将在收件人的收件箱中接收。
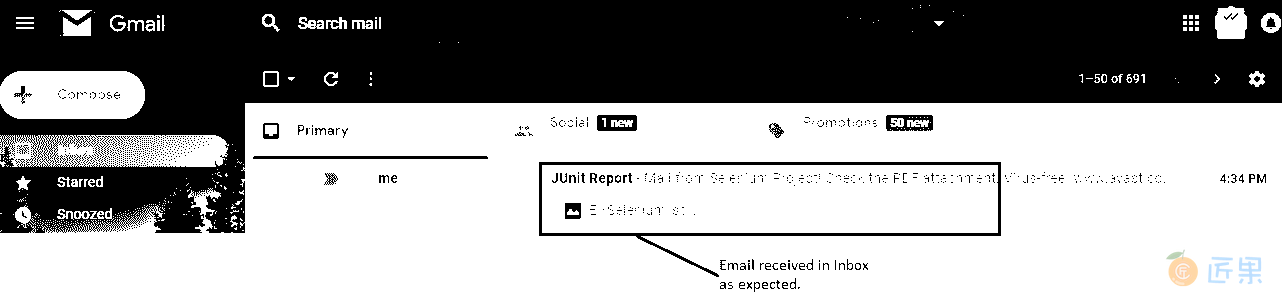
显示生成的带有附件的电子邮件,以供您参考。
注意: 当心! 您可能碰到“
javax.mail.AuthenticationFailedException”。 发生此异常的主要原因是 Google 提供的安全性和保护功能。 一种简单的解决方法是,通过单击链接 https://www.google.com/settings/security/lesssecureapps 来打开“允许安全程度较低的应用”的访问以进行测试。
下一节:本文告诉您为什么属性文件首先存在! 这个特定的概念不仅限于 Selenium WebDriver 项目。 它基本上可以用于任何涉及硬编码内容的 Java 项目中。
假设您有数百个自动化测试用例,并且在每个测试用例中,您都对要测试的应用的 URL 进行了硬编码。 到目前为止,一切都很好。 但是,如果弹出另一个版本,将应用 URL 更改为另一个版本,并且要再次执行相同的测试用例(回归测试),该怎么办? 您可能会想,“那很简单! 我只需要再运行一次构建文件。 只需单击一下,我就可以玩超级马里奥了!”。 您是否错过了 URL 部分? 手动转到每个测试用例并编辑硬编码的 URL 以使其正常工作又会带来多大的痛苦呢? 不好了!!!
别担心! 我们有一个解决方案。 财产文件将为我们提供帮助! 为了使您的测试用例更加动态,请确保不要在其中放入任何硬编码的值。 将这些值抽象到属性文件中,以便每当它们更改时,您都可以在一个位置进行编辑,并且测试用例可以再次完美地工作。
事不宜迟,让我们仅通过三个小步骤就可以了解如何在我们的项目中实现此目标,