嗨冠军! 屏幕截图。 在软件测试的拥挤街道上,另一个经常听到的术语。 如果您的环境中出现错误,而开发中没有错误,则无法用截图来证明,这是一个好测试! 因此,现在是时候该了解如何使用 Selenium WebDriver 来抓取了。
我知道您想到了几个问题。 最重要的是,“如果是手动测试,那么我只要按一下键盘上的PrntScr按钮,然后抓取一个漂亮的屏幕截图即可。 但是,当我实现自动化时,如何获得相同的结果?”
猜猜看,这很简单! 只需按照 3 个步骤进行操作,您就可以使用屏幕截图。 如果您像我一样,可能会急切地想看看它在代码中是如何工作的。 我的目标是取悦,所以请不要再拖延……
步骤 1:
使用 Selenium WebDriver 提供的TakesScreenshot接口。 将 WebDriver 对象强制转换为TakesScreenshot类型。
当您在TakesScreenshot下面看到一条弯曲的线时,只需单击import org.openqa.selenium.TakesScreenshot;包,您将没有任何错误。
// Cast driver object to TakesScreenshot
TakesScreenshot screenshot = (TakesScreenshot) driver;
步骤 2:
要将屏幕截图获取为图像文件,请调用“getScreenshotAs”方法。
import org.openqa.selenium.OutputType;
import java.io.File;
// Get the screenshot as an image File
File src = screenshot.getScreenshotAs(OutputType.FILE);
步骤 3:
将生成的图像文件复制到您选择的目标位置。 使用FileUtils类的copyFile方法可以轻松完成此操作。 重要的是要注意,此方法将引发IOException。 因此,作为一种好习惯,请将这段代码包装在try-catch块中。
import java.io.IOException;
import org.apache.commons.io.FileUtils;
import java.text.SimpleDateFormat;
import java.util.Date;
确保完全按照指定的方式导入包。 通常,您可能需要下载org.apache.commons.io jar(在撰写本文时为下载位置)并将其添加到项目的构建路径中。 之前,我们已经多次看到此过程,因此,我不再重复(请参阅本文第 3 步)。
另外,请注意,我们在代码中将图像另存为.jpg文件。 也可以将其另存为.png文件。
// Copy the screenshot to destination
FileUtils.copyFile(src, new File(“\\screenshot\\test.jpg”));
try {
    // Specify the destination where the image will be saved
    File dest = new File("\\Selenium\\screenshots\\" + testCaseName + "_" + timestamp() + ".jpg");
    // Copy the screenshot to destination
    FileUtils.copyFile(src, dest);
} catch (IOException ex) {
    System.out.println(ex.getMessage());
}
public static String timestamp() {
    // Timestamp to make each screenshot name unique
    return new SimpleDateFormat("yyyy-MM-dd HH-mm-ss").format(new Date());
}
在我们的示例中,我们将使用复杂的版本。 因为我们要将所有与屏幕快照相关的代码放在一个单独的方法中(在新类中),并在每次我们希望捕获屏幕快照时调用它。 否则,我们将不得不为每种情况做相同的歌舞。
概览
使用两种方法创建一个名为“SaveScreenshot.java”的新类。
public static void capture(String testCaseName, WebDriver driver)– 具有捕获屏幕快照并将其保存到所需位置的所有代码。public static String timestamp()– 用于生成时间戳并将其提供给上述方法,以使每个保存的屏幕截图都是唯一的。
示例场景
- 打开 Firefox 浏览器。
- 导航到 Google 帐户创建页面
- 通过 ID 找到名字文本框
- 输入“
fname01”作为名字 - 按名称找到姓氏文本框
- 输入“
lname01”作为姓氏 - 截取页面截图并将其保存到某个位置。
JUnit 代码:
- SaveScreenshot.java类
package com.blog.junitTests; import java.io.File; import java.io.IOException; import java.text.SimpleDateFormat; import java.util.Date; import org.apache.commons.io.FileUtils; import org.openqa.selenium.OutputType; import org.openqa.selenium.TakesScreenshot; import org.openqa.selenium.WebDriver; public class SaveScreenshot { public static void capture(String testCaseName, WebDriver driver) { // Cast driver object to TakesScreenshot TakesScreenshot screenshot = (TakesScreenshot) driver; // Get the screenshot as an image File File src = screenshot.getScreenshotAs(OutputType.FILE); try { // Specify the destination where the image will be saved File dest = new File("\\Selenium\\screenshots\\" + testCaseName + "_" + timestamp() + ".jpg"); // Copy the screenshot to destination FileUtils.copyFile(src, dest); } catch (IOException ex) { System.out.println(ex.getMessage()); } } public static String timestamp() { // Timestamp to make each screenshot name unique return new SimpleDateFormat("yyyy-MM-dd HH-mm-ss").format(new Date()); } } - Screenshot.java类(执行示例方案部分中详细介绍的步骤)
package com.blog.junitTests;
import java.util.concurrent.TimeUnit;
import org.junit.After;
import org.junit.Before;
import org.junit.Test;
import org.openqa.selenium.By;
import org.openqa.selenium.WebDriver;
import org.openqa.selenium.WebElement;
import org.openqa.selenium.firefox.FirefoxDriver;
public class ScreenshotTest {
  //Declaring variables
  private WebDriver driver;
  private String baseUrl;
  private String testCaseName = "ScreenshotTest";
  @Before
  public void setUp() throws Exception{
    // Selenium version 3 beta releases require system property set up
    System.setProperty("webdriver.gecko.driver", "E:\\Softwares\\"
        + "Selenium\\geckodriver-v0.10.0-win64\\geckodriver.exe");
    // Create a new instance for the class FirefoxDriver
    // that implements WebDriver interface
    driver = new FirefoxDriver();
    // Implicit wait for 5 seconds
    driver.manage().timeouts().implicitlyWait(5, TimeUnit.SECONDS);
    // Assign the URL to be invoked to a String variable
    baseUrl = "https://accounts.google.com/SignUp";
  }
  @Test
  public void testPageTitle() throws Exception{
    // Open baseUrl in Firefox browser window
    driver.get(baseUrl);
    // Locate First Name text box by id and
    // assign it to a variable of type WebElement
    WebElement firstName = driver.findElement(By.id("firstName"));
    // Clear the default placeholder or any value present
    firstName.clear();
    // Enter/type the value to the text box
    firstName.sendKeys("fname01");
    // Locate last name text box by name
    WebElement lastName = driver.findElement(By.name("lastName"));
    // Clear and enter a value
    lastName.clear();
    lastName.sendKeys("lname01");
    //Take a screenshot
    SaveScreenshot.capture(testCaseName, driver);
  }
   @After
    public void tearDown() throws Exception{
    // Close the Firefox browser
    driver.close();
  }
}
为每行代码提供了注释,因此它是不言自明的。

在 Eclipse IDE 中,“JUnit”窗格清楚地显示了测试用例“ScreenshotTest.java”已通过,并且控制台没有错误。
如代码中所指定,屏幕快照以上述格式的名称保存在“E:/Selenium/screenshots”路径中。
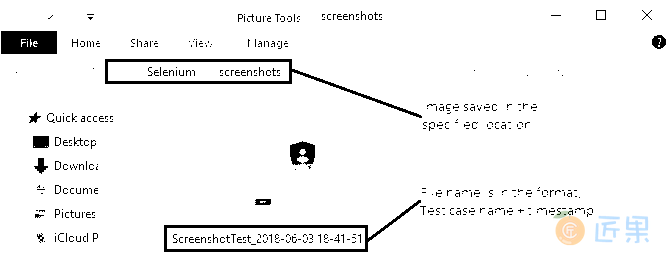
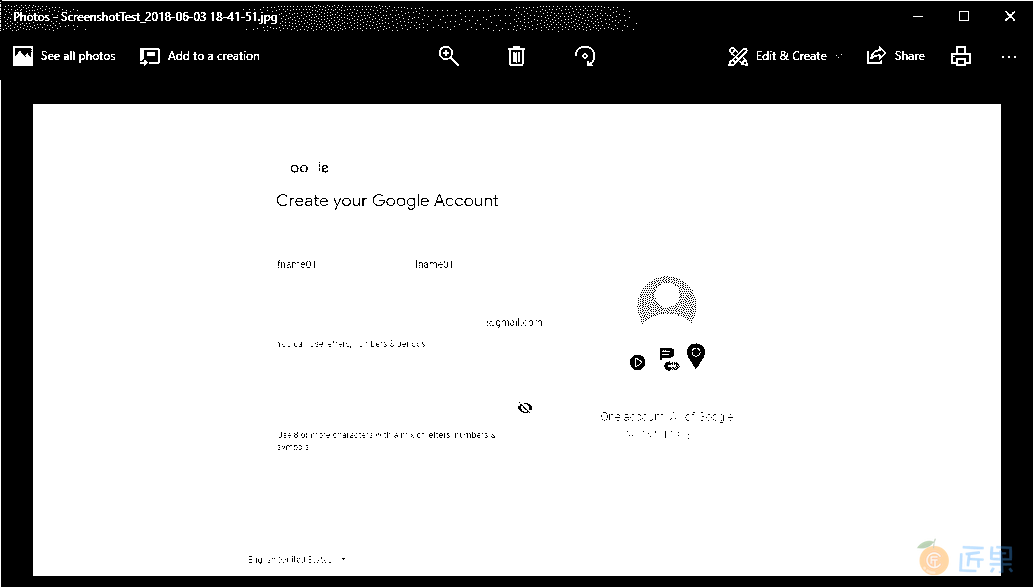
这是捕获的屏幕截图
将截屏图保存到 Word 文档
步骤 1:
下载几个 JAR,使我们的工作更加轻松。java2word-3.3.jar - 帮助我们创建 Word 文档并以所需方式对其进行操作。xstream-1.3.1.jar – 处理图片
让我们继续从 https://code.google.com/archive/p/java2word/downloads (在撰写本文时的下载位置)下载这两个 JAR 文件。 我还将这些 JAR 以及本文中处理的所有其他代码文件一起放在我们的 GitHub 仓库中。
步骤 2:
将这些 JAR 添加到我们的项目构建路径中。之前,我们已经多次看到此过程,因此,我不再重复(有关详细说明,请参阅文章的步骤 3)。
步骤 3:
创建一个类“SaveDocument.java”。将以下代码添加到类文件中:
import java.io.File;
import java.io.FileNotFoundException;
import java.io.PrintWriter;
import word.api.interfaces.IDocument;
import word.w2004.Document2004;
import word.w2004.Document2004.Encoding;
import word.w2004.elements.BreakLine;
import word.w2004.elements.Heading1;
import word.w2004.elements.Heading3;
import word.w2004.elements.Image;
import word.w2004.elements.Paragraph;
import word.w2004.style.HeadingStyle.Align;
public class SaveDocument {
  public static void createDoc(String testCaseName, String[] imgFileNames) {
    // Create a document object
    IDocument myDoc = new Document2004();
    myDoc.encoding(Encoding.UTF_8);
    // Inserts one breakline
    myDoc.addEle(BreakLine.times(1).create());
    // Add client logo to document header
    myDoc.getHeader().addEle(Image.from_FULL_LOCAL_PATHL("/Selenium/Logo.png")
        .setHeight("30")
        .setWidth("20")
        .getContent());
    // Add Project name to document header
    myDoc.getHeader().addEle(Heading3.with(" ProjectName").withStyle().align(Align.RIGHT).create());
    // Specify Test case name as document heading
        myDoc.addEle(Heading1.with(testCaseName + " Test Case").withStyle().align(Align.CENTER).create());
        myDoc.addEle(BreakLine.times(1).create());
        // Add a description paragraph
        myDoc.addEle(Paragraph
                .with("Following are the related screenshots")
                .create());
        myDoc.addEle(BreakLine.times(1).create());
        // Add company name to document footer
        myDoc.getFooter().addEle(
                Paragraph.with("@CompanyName").create());
        // Loop through all the image files
        for(String file:imgFileNames){
            // Insert each image file to the document
            myDoc.addEle(Image.from_FULL_LOCAL_PATHL(
                                "/Selenium/screenshots/" + file + ".png")
                                .setHeight("350")
                                .setWidth("500")
                                .getContent());
            // Insert 2 linebreaks at the end of each inserted image
            myDoc.addEle(BreakLine.times(2).create());
        }
        // Insert an image from web
        myDoc.addEle(Image
                .from_WEB_URL("http://www.google.com/images/logos/ps_logo2.png"));
        // Create the word document specifying a location
        File fileObj = new File("\\Selenium\\" + testCaseName + ".doc");
        PrintWriter writer = null;
        try {
         writer = new PrintWriter(fileObj);
        } catch (FileNotFoundException e) {
         e.printStackTrace();
        }
        String myWord = myDoc.getContent();
        writer.println(myWord);
        writer.close();
        // Print a confirmation image to console
        System.out.println("Word document created successfully!");
       }
}
每行都提供了注释,以使代码易于说明。
public static void createDoc(String testCaseName, String[] imgFileNames) -此方法有两个参数。 第一个是一个字符串,它指定测试用例的名称。 这将是将要创建的单词文档的名称。 第二个参数是作为该测试用例的一部分捕获的所有屏幕快照名称的数组。
在这种方法中,我们将创建一个文档对象并执行诸如
- 添加标题,段落
- 在标题中添加客户徽标和公司名称
- 在页脚中添加公司名称
- 插入作为特定测试用例一部分捕获的所有屏幕截图
- 从网上插入图片(只是为了证明这种情况也是可行的)
- 将单词文档和测试用例的名称保存在特定位置
步骤 4:
对“SaveScreenshot.java”文件进行了一些修改。对我们在先前文章中创建的“SaveScreenshot.java”类进行了一些更改。
- 删除生成时间戳的函数,并
- 文件扩展名从“
.jpg”更改为“.png”
现在的代码看起来像这样:
import java.io.File;
import java.io.IOException;
import org.apache.commons.io.FileUtils;
import org.openqa.selenium.OutputType;
import org.openqa.selenium.TakesScreenshot;
import org.openqa.selenium.WebDriver;
public class SaveScreenshot {
  public static void capture(String screenshotName, WebDriver driver) {
    // Cast driver object to TakesScreenshot
    TakesScreenshot screenshot = (TakesScreenshot) driver;
    // Get the screenshot as an image File
    File src = screenshot.getScreenshotAs(OutputType.FILE);
    try {
      // Specify the destination where the image will be saved
      File dest = new File("\\Selenium\\screenshots\\" + screenshotName + ".png");
      // Copy the screenshot to destination
      FileUtils.copyFile(src, dest);
    } catch (IOException ex) {
      System.out.println(ex.getMessage());
    }
  }
}
示例场景
- 打开 Firefox 浏览器。
- 导航到 Google 帐户创建页面
- 通过 ID 找到名字文本框
- 输入“
fname01”作为名字 - 截取屏幕截图,并将其命名为“
testCaseName+1” - 按名称找到姓氏文本框
- 输入“
lname01”作为姓氏 - 截取屏幕截图并将其命名为“
testCaseName+2” - 在指定位置创建一个 word 文档,并将这两个屏幕截图都插入其中。
JUnit 代码:
WordDocWithScreenshotTest.java类import java.util.concurrent.TimeUnit; import org.junit.After; import org.junit.Before; import org.junit.Test; import org.openqa.selenium.By; import org.openqa.selenium.WebDriver; import org.openqa.selenium.WebElement; import org.openqa.selenium.firefox.FirefoxDriver; import com.blog.utilities.SaveDocument; import com.blog.utilities.SaveScreenshot; public class WordDocWithScreenshotTest { //Declaring variables private WebDriver driver; private String baseUrl; private String testCaseName = "WordDocWithScreenshot"; @Before public void setUp() throws Exception{ // Selenium version 3 beta releases require system property set up System.setProperty("webdriver.gecko.driver", "E:\\Softwares\\" + "Selenium\\geckodriver-v0.10.0-win64\\geckodriver.exe"); // Create a new instance for the class FirefoxDriver // that implements WebDriver interface driver = new FirefoxDriver(); // Implicit wait for 5 seconds driver.manage().timeouts().implicitlyWait(5, TimeUnit.SECONDS); // Assign the URL to be invoked to a String variable baseUrl = "https://accounts.google.com/SignUp"; } @Test public void testPageTitle() throws Exception{ // Open baseUrl in Firefox browser window driver.get(baseUrl); // Locate First Name text box by id and // assign it to a variable of type WebElement WebElement firstName = driver.findElement(By.id("firstName")); // Clear the default placeholder or any value present firstName.clear(); // Enter/type the value to the text box firstName.sendKeys("fname01"); //Take a screenshot SaveScreenshot.capture(testCaseName + "1", driver); // Locate last name text box by name WebElement lastName = driver.findElement(By.name("lastName")); // Clear and enter a value lastName.clear(); lastName.sendKeys("lname01"); // Take a screenshot SaveScreenshot.capture(testCaseName + "2", driver); // Create a word document and include all screenshots SaveDocument.createDoc(testCaseName, new String[]{testCaseName + "1",testCaseName + "2"}); } @After public void tearDown() throws Exception{ // Close the Firefox browser driver.close(); } }
如果遵循注释,该代码是不言自明的。 Eclipse 的输出如下,
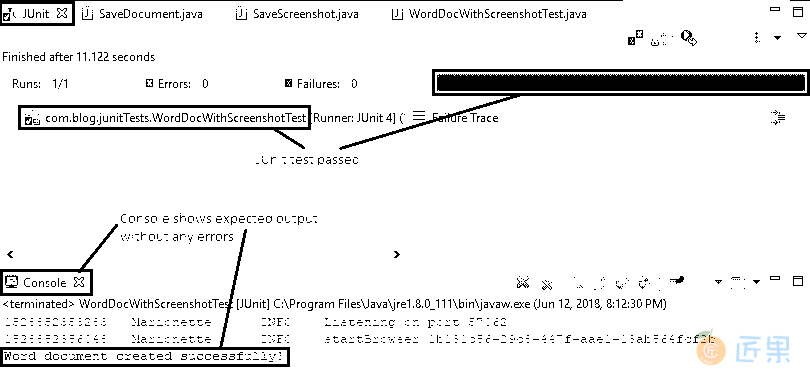
在 Eclipse IDE 中,“JUnit”窗格清楚地显示了测试用例“WordDocWithScreenshotTest.java”已通过,并且控制台没有错误。 按预期打印“Word 文档创建成功”。
按照代码中的指定,屏幕快照将以上述格式的名称保存到“E:/Selenium/screenshots”路径中。

还将创建单词文档并将其保存在指定的位置“ E:/Selenium/”中。 该文件如下所示,

创建的 Word 文档,所有代码文件和 JAR 文件都放置在 GitHub 仓库中,以便于访问。 您可以为仓库加注星标和分支以方便使用。 请仔细阅读“README.md”文件以获取明确说明。
下一节:现在我们已经有了 PDF 格式的 JUnit 报告,让我们将其附加到电子邮件中并发送给各个项目利益相关者。 因此,今天我们主要将仅使用 Java。 大家都来一杯咖啡(Java)!